Modifying Godot's Vulkan back-end to support hardware accelerated raytracing
Hybrid reflections in Godot engine’s Vulkan back-end
This is a short blog post talking about my personal contributions to implementing hybrid diffuse reflections into Godot’s back-end. I want to give big thanks to the fellow contributors of this project, Timethy and Luc. They were a big help in the setup of the Vulkan back-end in Godot.
The post will specifically go into detail on the hybrid reflections, which are not limited to Godot. If you are more interested in the implementation details of how we got everything up and running, I would suggest looking at the project page.
Raytracing shaders
Compared to the traditional rasterization pipeline, the ray tracing pipeline uses different shaders to get pixels to the screen. We start off with the raygen shader, which takes care of creating the rays and shooting them in the desired directions. This is essentially the starting point of the ray tracing pipeline. Next up we have the closest hit shader, which is invoked when the ray intersects any primitive inside the BLAS. We also have the miss shader, which is invoked when no primitive is hit. There are more types which are optional, like the intersection shader, which can be used for custom procedural behavior like voxel volume intersection, and last up the any hit shader, which is also optional and is used for any potential intersections like transparent surfaces.

Hybrid reflections
Now that we have a better idea of how the shader pipeline works, I will show you how I achieved hybrid reflections starting in the raygen shader. For hybrid reflections we still use rasterization as the “primary ray.” We can render everything as normal except for the reflections; of course, these are handled by the RT pipeline.
1
2
3
4
5
6
7
8
9
10
11
12
13
14
15
16
17
18
19
20
21
22
23
24
25
26
27
28
29
30
31
32
33
34
void main(){
	ivec2 pix_coords = ivec2(gl_LaunchIDEXT.xy);

	// Get the rasterized image
	vec3 rasterized_base = imageLoad(image, pix_coords).xyz;

	const vec2 pixel_center = vec2(gl_LaunchIDEXT.xy) + vec2(0.5);
	const vec2 in_uv = pixel_center / vec2(gl_LaunchSizeEXT.xy);
	vec2 d = in_uv * 2.0 - 1.0;

	vec4 clip = vec4(d, 0.0, 1.0);
	vec4 worldDir = ubo.data.inverseViewProj * clip;
	worldDir /= worldDir.w;

	vec4 normal_roughness =  imageLoad(normal, pixCoords);
	vec3 encoded_normal = normal_roughness.xyz;
	float roughness = normal_roughness.w;

	vec3 decoded_normals = vec3(0.0f);
	// Remap to 0, 1 to -1, 1 range
	decoded_normals = encoded_normal.xyz * 2.0f - 1.0f;

	// Transform view space normals to world space
	decoded_normals = normalize(mat3(ubo.data.inverseView) * decoded_normals);

	float metallicValue = imageLoad(specular, pixCoords).w;

	float depth = imageLoad(depth, pixCoords).r;

	vec3 world_pos = reconstruct_position_from_depth(in_uv, depth);

	float t_min = cam.near;
	float t_max = cam.far;
}
We basically want to fetch all the GBuffer data as described above since we need it to calculate the secondary rays. The world position is reconstructed from the depth since Godot doesn’t store this, and the roughness and metallic are both combined into different render targets.
With this data we prepare the rays for their first reflections.
1
2
3
4
5
6
7
8
9
	// View direction
	vec3 V = normalize(ubo.data.cameraPos - world_pos);

	// Reflection direction
	vec3 R = reflect(-V, decoded_normals);

	// prd is the hit payload which is basically a struct that takes the data between the different RT stages
	prd.rayOrigin = vec4(world_pos + decoded_normals * 0.001, 1.0);
	prd.rayDir = vec4(R, 0);
Now that all the data is prepared to start the actual tracing, I opted for an iterative ray tracing loop since this is recommended by the Nvidia ray tracing sample. The iterative loop can handle arbitrarily deep reflection chains up to around 50–100+ bounces, while the recursive loop is limited by the GPU’s capabilities, for most GPUs around 4–31 levels.
Knowing this information I decided to go with the iterative loop.
1
2
3
4
5
6
7
8
9
10
11
12
13
14
15
16
17
18
19
20
21
22
23
24
25
26
27
int depth = 0;
prd.attenuation = 1.0f * fresnel;
// Check to see if the miss shader is invoked
prd.done = 0;
	// Iterative loop for the reflections
	while(depth < 2)
	{
		// Vulkan trace call
		traceRayEXT(tlas, // Acceleration structure (Top level)
		gl_RayFlagsOpaqueEXT, // Ray flag (Opaque objects)
		0xFF, // Cull mask (8 bit mask)
		0, // Shader binding table offset
		0, // Shader binding table stride
		0, // Miss index
		prd.rayOrigin.xyz, // Ray origin
		t_min, // Minimum travel distance
		prd.rayDir.xyz, // Ray direction
		t_max, // Maximal travel distance
		0 // Hit payload index
		);

		// Color of the reflections combined which diminishes over per bounce
		reflection_color += prd.hitValue * prd.attenuation;
		prd.attenuation *= prd.fresnel; // reduce attenuation depending on the fresnel term
		depth++;
	}
}
The loop is quite simple, and in the closest hit shader we will just give the reflected objects color and shading depending on the material of the object.
1
2
3
4
5
6
7
8
9
10
11
12
13
14
15
16
17
18
19
20
21
22
23
24
25
26
27
28
29
30
31
32
33
34
35
36
37
38
39
40
41
42
43
44
45
46
47
48
49
50
51
52
53
54
55
56
57
58
59
60
61
62

// Barycentrics from hit attributes
vec3 bary = vec3(1.0 - attribs.x - attribs.y, attribs.x, attribs.y);

// Hit position of the reflected object
vec3 hitPos = gl_WorldRayOriginEXT + gl_WorldRayDirectionEXT * gl_HitTEXT;

uint mat_index = gl_InstanceCustomIndexEXT;

MaterialData mat = material.materials[mat_index];

vec3 albedo = mat.color.rgb;
float metallic = mat.metallicData;
float roughness = mat.roughnessData;

// Textures are loaded with bindless which Timmy implemented
// Example of loading albedo color this way
if (mat.albedo_texture_index > 0) { // Check if texture is valid
       vec3 tex_color = texture(albedo_texture[nonuniformEXT(mat.albedo_texture_index)], uv).rgb;
 }

 // Load other materials

 // Pbr equation matches Godot's base version
 vec3 N = normal;
 vec3 V = normalize(-gl_WorldRayDirectionEXT);
 vec3 R = reflect(gl_WorldRayDirectionEXT, normal);
 vec3 L = normalize(ubo.data.lightDirection - hitPos);
 vec3 H = normalize(V + L);

 vec3 F0 = vec3(0.04f, 0.04f, 0.04f);
 F0 = mix(F0, albedo.rgb, metallic);

 float ndotl = max(dot(N, L), 0.0f);
 float ndotv = max(dot(N, V), 0.0f);
 float hdotv = max(dot(H, V), 0.0f);
 float ndoth = max(dot(N, H), 0.0f);
 float ldoth = max(dot(L, H), 0.0f);

 float NDF = D_GGX(ndoth, roughness);
 float G = V_GGX(ndotl, ndotv, roughness);
 vec3 F = F0 + (1.0 - F0) * SchlickFresnel(hdotv);

 vec3 numerator = NDF * G * F;
 float denominator = max(4.0f * ndotv * ndotl, 0.0001f);
 vec3 specular = max(numerator / denominator, vec3(0.0f, 0.0f, 0.0f));

 vec3 kS = F;
 vec3 kD = 1.0f - kS;
 kD *= (1.0f - metallic);

 float diffuse = DiffuseBurley(ndotl, ndotv, ldoth, roughness);

 vec3 Lo = (kD * albedo.rgb * vec3(diffuse) + specular) * ndotl;

 // Setup the origin and direction for the next bounce
 prd.rayOrigin = vec4(hitPos + normal * 0.001, 1.0f);
 prd.rayDir = vec4(R, 0);

 // Set the outgoing radiance as the hit color
 prd.hitValue = Lo;
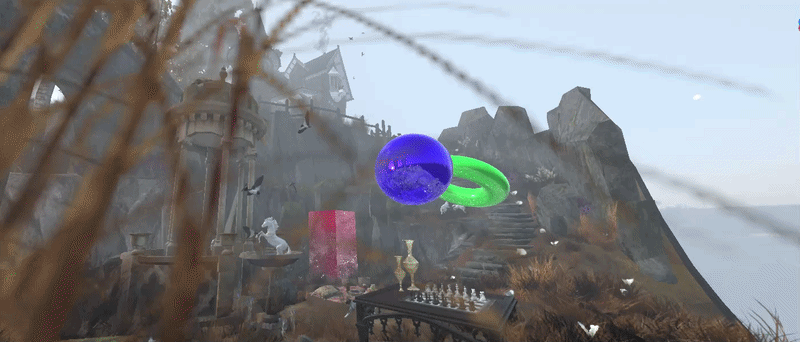
This will give us basic direct reflections as can be seen in the video below:
Reflections without PBR shading
Reflections with PBR shading
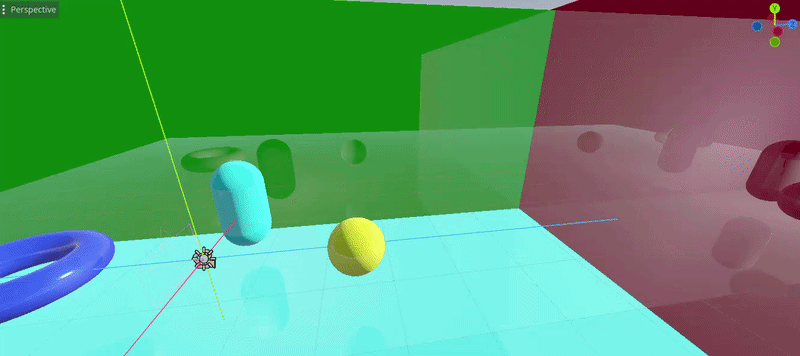
It is still not perfect and all the reflections are direct, which seems a little unnatural, so the next step is to implement diffuse reflections based on the roughness of the material.
For this I used a technique called cosine weighted sampling to offset the ray direction in a cone to create the diffuse look. This is not the most optimal method for real-time games since it creates some noise, which can be taken care of by accumulating the final output over multiple frames and using reprojection. I will definitely revisit this in the future since it could use some improvements.
1
2
3
4
5
6
7
8
9
10
11
12
13
14
15
16
17
18
19
20
21
22
23
24
25
26
27
28
29
30
vec3 cosine_sampled_hemisphere(vec3 dir, float roughness){
	// If roughness contribution is low just shoot the ray directly
	if (roughness < 0.001)
		return dir;

	// Sampling random numbers between -1, 1 for the sampling
	// The seed is modified everytime rand_float is called
	float r1 = rand_float();
    float r2 = rand_float();

	// TBN direction
	vec3 up = abs(dir.z) < 0.999 ? vec3(0, 0, 1) : vec3(1, 0, 0);
    vec3 tangent   = normalize(cross(up, dir));
    vec3 bitangent = cross(dir, tangent);

	// Roughness base cone sampling
	float alpha = roughness * roughness;
    float cos_theta = sqrt((1.0 - r1) / (1.0 + (alpha * alpha - 1.0) * r1));
    float sin_theta = sqrt(max(0.0, 1.0 - cos_theta * cos_theta));
    float phi = 2.0 * M_PI * r2;

     vec3 local_dir = vec3(
        sin_theta * cos(phi),
        sin_theta * sin(phi),
        cos_theta
    );

	// local direction to world space direction
	return normalize(tangent * local_dir.x + bitangent * local_dir.y + dir * local_dir.z);
}
Source: https://pema.dev/obsidian/math/light-transport/cosine-weighted-sampling.html
In the trace loop we now set the new direction of the ray as the new calculated direction.
1
2
3
vec3 random_direction = cosine_sampled_hemisphere(R, roughness);

prd.rayDir = vec4(random_direction, 0);
As I explained above, this method does come at the cost of having noisy images, so to combat this I implemented accumulation. For the reflections I just take multiple samples and combine them as follows:
1
2
3
4
5
6
7
8
9
10
11
12
13
14
15
16
17
18
19
20
21
22
23

int samples = 32;
for(int s = 0; s < samples; s++) {
	// Randomize ray direction depending on roughness

	while(depth > 2){
		// Execute ray loop

		// Add color
		reflection_color += prd.hitValue * prd.attenuation;
		prd.attenuation *= prd.fresnel; // reduce attenuation depending on the fresnel term

		depth++;
	}
}

// Average out the samples to get the correct color
reflection_color /= samples;

// Divide the accumulated frames by the amount of frames captured in the accumulation render target
vec3 avg_color = reflection_color / vec3(push.frame_count);
imageStore(image, pixCoords, vec4(rasterized_base + avg_bounces, 1.0));
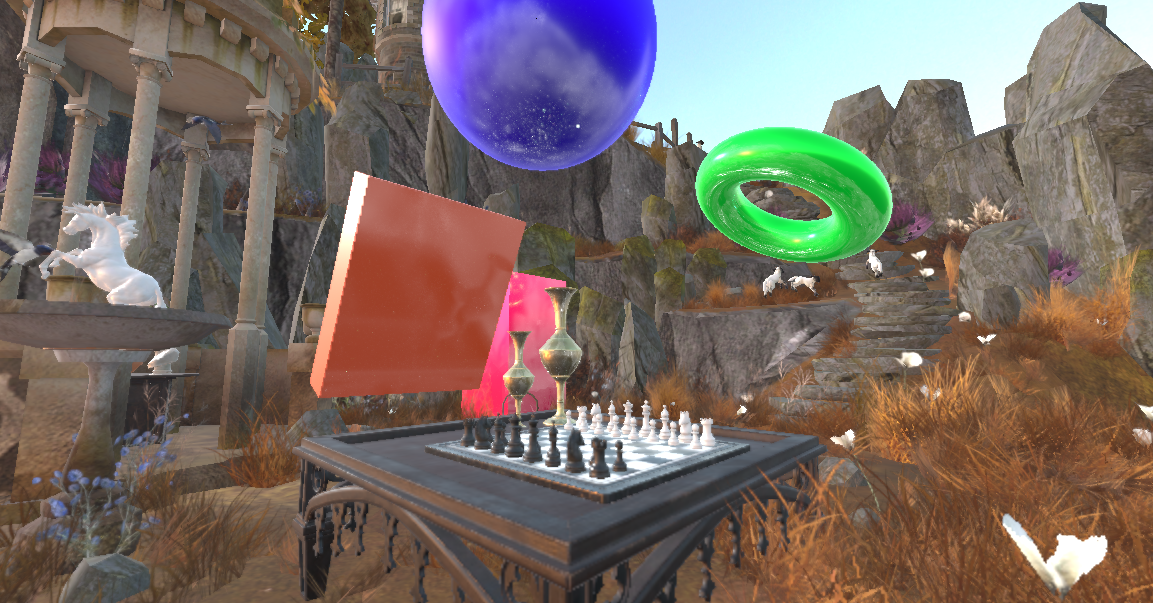
The frame_count and accumulation render target need to be reset if any movement occurs, and when we combine everything we get the results below.
Final result
Conclusion
This was an interesting project which was both a lot of fun and hard work, implementing this technique in a big open source engine without any prior knowledge about hardware ray tracing. But I learned a lot from it, and I hope I shared a little of my knowledge with you guys.
I hope this article gave you a good insight into the topic. If you have any questions, feel free to send an email to 230160@buas.nl.
Here are the resource I used that helped shape this project:
- Nvidia Vulkan raytracing tutorial
- Vulkan documentation
- Cosine weighted sampling
- Scratch a pixel
- Rendering perfect reflections Nvidia
This blog post was created by Jim van der Heijden, in Godot engine as a group project later continued as a self study project during my third year as a student of the Creative Media and Game Technologies course at Breda University of Applied Sciences.